Tuesday, October 23, 2012

Spooky Witches Fingers


This sugar cookies are perfect for the coming Halloween!!
The recipe is easy to prepare and kids would love to help shape the fingers or put on the almond nails :)
Use green or purple color to make the fingers even more witch like :)

Spooky Witches Fingers
Ingredients:

1 cup butter, softened
1 cup confectioners sugar
1 egg
1 teaspoon almond extract
1 teaspoon vanilla extract
2 2/3 all purpose flour
1 teaspoon baking powder
1 teaspoon salt
3/4 cup whole almonds

Food color optional
Few drops green, purple or any other color you want to use.

Directions:
Preheat oven to 325 degrees F (165 degrees C). Lightly grease baking sheets.
Combine the butter, sugar, egg, almond extract, and vanilla extract in a mixing bowl. Beat together with an
electric mixer. Gradually add the flour, baking powder, and salt, continually beating.
Refrigerate 20 to 30 minutes.
Remove dough from refrigerator in small amounts. Scoop 1 heaping teaspoon at a time onto a piece of waxed paper. Use the waxed paper to roll the dough into a thin finger-shaped cookie. Press one almond into one end of each cookie to give the appearance of a long fingernail. Squeeze cookie near the tip and again near the center of each to give the impression of knuckles. You can also cut into the dough with a sharp knife at the same points to help give a more finger-like appearance.
Arrange the shaped cookies on the baking sheets.
Bake in the preheated oven until the cookies are slightly golden in color, 20 to 25 minutes.

Optional:
Remove the almond from the end of each cookie. Squeeze a small amount of red decorating gel into its place. Place the almond to cause the gel to ooze out around the tip of the cookie.
TIP: This cookies are not very sweet. For sweeter version, you can use additional 2 -3 tablespoons sugar.
When you are forming the fingers, make them longer and thinner for a better shaped fingers.

Enjoy!!

Friday, October 19, 2012

Butterscotch Cake

This cake is based on a recipe I have from Martha Steward web site.
I modified it to be more moist and the butterscotch sauce crunchier :)

Butterscotch Pecan Cake from Martha Stewart

My version with little changes:

Ingredients:

Cake
2 cups all purpose flour
1 cup whole wheat flour
1 1/4 teaspoon baking powder
3/4 baking soda
1 teaspoon salt
2 1/2 stick butter ( you can use half of the butter, rest apple sauce)
2 1/2 brown sugar
4 eggs
1 1/4 cup buttermilk
1 table spoon vanilla extract
1 teaspoon rum, or rum extract

Frosting
3 sticks butter
2 cups brown sugar
1 cup heavy cream
1/2 teaspoon salt
20 ounces cream cheese
1/2 cup confectioners sugar

Butterscotch sauce
2/3  brown sugar
6 table spoons butter
1/2 cup light corn syrup
1/4 teaspoon salt
1/2 cup heavy cream

Method:

All the ingredients for the cake should be room temperature.
If using apple sauce instead of butter, the cake will have more moisture to it and reduce the calories. For a butter taste simply add a teaspoon of butter essence.

Directions

Make the cakes:
Preheat oven to 325 degrees. Coat three 8-by-2-inch round cake pans with cooking spray, line with parchment, and coat parchment. Whisk flour, baking powder, baking soda, and salt in a medium bowl.
Beat butter and brown sugar with a mixer on medium-high speed until pale and fluffy, about 5 minutes. Beat in eggs, 1 at a time, beating well after each addition, then add vanilla and rum. Reduce speed to low. Add flour mixture in 2 additions, alternating with buttermilk. Raise speed to medium-high, and beat for 2 minutes. Divide batter among pans.
Bake cakes until golden brown and testers inserted in centers come out clean, about 40 minutes. Transfer pans to wire racks, and let cool slightly. Invert cakes onto racks. Let cool.

Make the frosting:
Melt 1 stick butter in a medium saucepan over medium heat until dark golden brown, about 10 minutes. Add brown sugar, cream, and salt, stirring until sugar dissolves. Bring to a boil, whisking constantly, and cook for 3 minutes. Transfer to a mixer bowl, and let cool.
With machine running, add remaining butter, a few pieces at a time, and beat on low until incorporated. Raise speed to medium, and beat for 2 minutes. In another bowl, beat cream cheese and confectioners' sugar on medium-high until fluffy and smooth, about 3 minutes. Add brown-butter mixture to cream cheese, and beat until smooth. Cover, and refrigerate until chilled, at least 2 hours (or overnight, beating on low speed before using).

Make the butterscotch sauce:
Mix sugar, butter, corn syrup, and salt in a small saucepan over medium heat, and cook, stirring, until sugar dissolves. Bring to a boil, and cook for 2 minutes. Remove from heat, and whisk in cream. Return to heat, and cook for 3-4 more minutes. Let cool slightly. It should thicken in order to form crunchy layer on the cake.

To assemble the cake:
Trim tops of 2 cake layers and top and bottom of third (this will be the middle) to create flat exposed surfaces. Brush 1/4 cup plus 2 tablespoons butterscotch sauce on cut sides. Let cool. Spread 1 cup frosting on 1 layer, then place middle layer on top, sauce side down. Spread 1 cup frosting on middle layer, then place third layer on top, sauce side down. Spread 1 cup frosting on top and sides. Refrigerate until firm, about 1 hour.
Using an offset spatula, spread remaining frosting on top and sides of cake. Press chopped pecans on sides, and garnish top with halves. Transfer cake to a serving plate or cake stand. Refrigerate until firm, at least 4 hours (or up to 2 days, covered).
Enjoy!!! 
.

Friday, October 12, 2012

Eclair


Eclair with vanilla filling and chocolate topping
Ingredients:
  • 1/2 cup butter
  • 1 cup water
  • 1 cup all-purpose flour
  • 1/4 teaspoon salt
  • 4 eggs
  • 1 (5 ounce) package instant vanilla pudding mix
  • 2 1/2 cups cold milk
  • 1 cup heavy cream
  • 1/4 cup confectioners' sugar
  • 1 teaspoon vanilla extract
  • 2 (1 ounce) squares semisweet chocolate
  • 2 tablespoons butter
  • 1 cup confectioners' sugar
  • 1 teaspoon vanilla extract
  • 3 tablespoons hot water
Directions:Preheat oven to 450 degrees F (230 degrees C). Grease a cookie sheet.In a medium saucepan, combine 1/2 cup butter and 1 cup water. Bring to a boil, stirring until butter melts completely. Reduce heat to low, and add flour and salt. Stir vigorously until mixture leaves the sides of the pan and begins to form a stiff ball. Remove from heat. Add eggs, one at a time, beating well to incorporate completely after each addition. With a spoon or a pastry bag fitted with a No. 10, or larger, tip, spoon or pipe dough onto cookie sheet in 1 1/2 x 4 inch strips.Bake 15 minutes in the preheated oven, then reduce heat to 325 degrees F (165 degrees C) and bake 20 minutes more, until hollow sounding when lightly tapped on the bottom. Cool completely on a wire rack.


Filling:
Combine pudding mix and milk in medium bowl according to package directions. In a separate bowl, beat the cream with an electric mixer until soft peaks form. Beat in 1/4 cup confectioners' sugar and 1 teaspoon vanilla. Fold whipped cream into pudding.

Assembling:
Cut tops off of cooled pastry shells with a sharp knife. Fill shells with pudding mixture and replace tops.Icing:
For the icing, melt the chocolate and 2 tablespoons butter in a medium saucepan over low heat. Stir in 1 cup confectioners' sugar and 1 teaspoon vanilla. Stir in hot water, one tablespoon at a time, until icing is smooth and has reached desired consistency. Remove from heat, cool slightly, and drizzle over filled eclairs. Refrigerate until serving.
Enjoy!!!


Pumpkin whoopee pies

Kids are back to school, leaves are turning orange, red....It's Falls again!
What a better time to find a good new pumpkin recipes and warm up the kitchen with the fresh pie, cookies,  scones or whoopee pies!
Who really does not like the smell of pumpkin and cinnamon... it reminds me of the beginning of the holidays for most of us. From now until Jan its all about baking cakes, cookies, and making all kinds of delicious food to help us all enjoys the holidays!!

Lets start with pumpkin whoopee pies. 
This is a recipe I found on marthastewart.com and wanted to try making this delicious pies for the kids to enjoy :) and sure they did!!!


Ingredients:

Dough: 
3 cups all purpose flour
1 teaspoon baking powder
1 teaspoon baking soda
1 teaspoon salt
1 tablespoon ground ginger
2 tablespoon ground cinnamon
1/2 teaspoon ground cloves
2 cups brown sugar
1 cup vegetable oil
3 cups pumpkin puree
2 large eggs
1 teaspoon vanilla extract

Cream Cheese Filling
1 stick, 1/2 cup butter
3 cups confectioners sugar
8 ounces cream cheese
1 teaspoon vanilla extract

Directions:
Preheat oven to 350 F.
Oil two baking sheets. Set them aside.

Whisk together flour, salt, baking power, baking soda, ginger and cloves.

In a different bowl beat brown sugar and oil until well combined. Add pumpkin puree, eggs and vanilla, Mix well.  Now, add the flour mixture and whisk until fully incorporated.
Using a small ice cream scoop , drop heaping tablespoon of dough into  prepared baking sheet 1 inch apart. Bake until cookies start to crack on top and a toothpick inserted into the center of the pies comes out clean - 15 mins. Let them cool down completely.

Filling:

Beat butter untill smooth. Add cream cheese and beat until well combined. Add confectioners sugar and vanilla. Beat until smooth.
Assembling:

Transfer filling to a disposable pastry bag and snip the end. Once the pies have cooled completely pipe a large dollop of filling on the flat side of the cookies. Sandwich with remaining cookies and press down slightly so that the filling spreads to the edge of the cookie.  Refrigerate for at least 30 mins up to 3 days.


Enjoy!!!


Monday, July 23, 2012

Dinner rolls

This is a no fail recipe!!!! Very soft and delicious rolls.
Can be made bigger for sandwich  buns
They hold well for 2-3 days, if they stay for so long ;),  and can be taken on a road trip, picnic, or any other place ;)
Kids can eat them for breakfast, with little butter and jam, lunch or dinner.

Ingredients:
1 pkg yeast
1/4 cup warm water
1 cup buttermilk, room temperature
1/4 cup butter
2 table spoons sugar
1 teaspoon salt
1/4 teaspoon baking soda
1 egg
4 cups all purpose flour
2 teaspoon cornmeal
1 table spoon oil or butter to brush the rolls before baking

Method:

Devolve the yeast in 1/4 cup warm water with 1 teaspoon flour, sugar and little salt. Keep aside for 5 mins.
Mix room temperature buttermilk, butter, remaining sugar, salt, baking coda, egg and yeast. Beat well until well blended. Add flour to form soft dough. Knead for 10 minutes and place in a greased bowl in a dark warm place to rise for about 1 hour.
Punch down the dough and knead for about 5 minutes on a lightly floured surface.
divide into 24 small or 12 big pieces. Shape each one as a ball. Grease a skillet or a baking dish and place the rolls in it. Cover with cloth and let rise until doubled. Brush the top with oil or warm butter and bake for  18-20 mins or until golden brown in a preheated oven at 375F.
Let the rolls cool down and remove them from the skillet or the pan.

Enjoy!!!

Thursday, July 12, 2012

Hummingbird Cake


This cake is a wonderful combination of nuts, pineapple, bananas and cinnamon. The cream cheese butter frosting compliment the cake perfectly! Favorite to kids and adults! Easily made as cupcakes as well.
I would encourage everyone to make this cake and enjoy it with family and friends!

Ingredients:
31/2 cups flour
1 1/2 cups sugar
1 teaspoon cinnamon
1 teaspoon baking soda
1 cup mashed bananas
1 cup chopped walnuts
1 1/4 cup chopped pineapple
4 table spoon of the pineapple juice
1 cup oil

Frosting:
1/4 cup butter
2/3 cups cream cheese
3 cups confectioner sugar
1 teaspoon vanilla

Method:
Preheat oven to 350F. Grease three 9'' round pans.
In a large bowl stir to combine flour, sugar, baking soda, cinnamon. Add bananas, pineapple, nuts, eggs, oil and pineapple juice. Mix well with wooden spatula.


Pour the batter into the 3 round baking pans and bake for 20-25 mins until golden on top.
Let them cool down.


To make the frosting, beat together butter and cream cheese well. Mix in sugar and vanilla.
Spread frosting on top of the first layer, place the second layer on top and spread more frosting. Use the remaining frosting on top of the third layer and around the cake if you have some extra.
You can decorate the cake with whole pieces walnuts or chopped nuts as per your taste.


Enjoy!!!


Wednesday, July 11, 2012

Focaccia


Who doesn't like this flat Italian bread? Coated with sea salt and herbs....yum yum yum...You can dip it in seasoned olive oil, eat it with herbal butter or any spread you like! You just cant get enough of it! Am I not right?

It's so simple to make and the aroma coming out while baking it will make you want to eat it right out of the oven still warm and burning your tongue. Its wort trying it again and again topped with your own herbal combination, caramelized onions, olive olives or just pesto :).

Ingredients:
3 1/2 cup all purpose flour
1pkg yeast (7g)
5 table spoons olive oil
1 table spoon salt
water to make the dough , I think it comes to 1 1/2 cup, still start with 1 and go on as much as needed.

Seasoning
2 teaspoons coarse sea salt

Optional:
oregano, basil, or any other herb you like to add here.
caramelized red onions, olives or cherry tomatoes...

Method:
Preheat the oven to 400F.
Dissolve yeast in a half cup warm water. Keep it in a warm and dark place for 10 mins for the yeast to ferment well.
Meanwhile mix flour and salt. Add 2 table spoon olive oil, yeast, and water to make a dough. Start kneading for about 10 min until dough is smooth and elastic. Leave the dough to rest in a warm, dark place until doubles its size. Make sure to oil the bowl in which you will keep the dough and cover it with dump cloth while resting. To speed up the process, you can preheat the oven little bit and leave the dough in it to
rest.
Grease 9 or 10 '' round baking pan.
Next, take the dough out and knead for a few minutes. Press it down to form a circle to fit in your baking pan.
Leave it to rise for 30 mins. 
Right before baking make wells all over the focaccia while poking the dough with a finger.
Coat the bread with the remaining olive oil using pastry brush. Sprinkle sea salt and any herbs you are using.
Bake for 20-25 mins until the bread is pale gold.
Let the focaccia cool down little bit and its ready to eat!!!


Enjoy!!!!

Monday, July 9, 2012

Orange Bundt Cake

Almost everybody has leftover orange juice in the fridge and, or oranges  hiding somewhere in there too ;)
Here is a recipe I have for years and don't remember if I tried or not. I decided to give it a try before kids finish the few oranges left in the fridge, and to be hones I just feel like eating a bundt cake :) ..

Ingrediants:
1 cup butter
1 cup sugar
3 eggs
2 1/4 cups flour
2 teaspoons baking powder
finely grated zest of 1 orange
2/3 milk
1/2 cup orange juice
strips of orange zest for decoration

Syrup:
3/4 cup sugar
2/3 cup orange juice

Method:
Preheat the oven to 325F.
Grease and lightly flour a bundt ring pan.

Combine flour, baking powder and grated orange zest. Keep aside.
In a separate bowl beat the butter and sugar together until pale and fluffy. Add one egg at the time and beat thorough after each one. Fold in the flour mix and mix well. Add milk and orange juice , stirring to mix evenly.
Pour the batter into the baking pan and bake for about 45-50 mins..
Let cool down in a pan for 5-10 mins and turn out on a wire rack to cool completely.

Meanwhile make the syrup, mix both sugar and juice in a pan and bring to a boil. Simmer for about 5 mins until reduced and syrupy.
Spoon the syrup over the cake until still warm and top with orange zest.
Enjoy!!!


Tuesday, June 26, 2012

Home made Indian cheese - panir

Panir is a cheese used in vegetarian Indian dishes. Can be frozen easily for months.

Ingredients
1/2 gallon whole milk
1/4 cup white vinegar or lemon juice
1 teaspoon salt- optional

Method:

Boil the milk on med flame to avoid burning. Once the milk is boiling, add the vinegar and mix well. Next, the milk will start to curdle and separate from the whey water. The whey water should be very light yellow in color. If the milk is not curdled well (the liquid still looks white, not yellow water) add a teaspoon of vinegar at a time until you start seeing the water separating from the curdle. keep the flame on until the curd and whey water separate completely. Turn the heat off and let it all cool down little bit, 20-30 mins.
Strain through cheese cloth in a strainer. Tide the cheese cloth very tide around the panir and let the water drain  for about 4-5h. or over night.  Once the panir fills firm and the water is drained place something heavy on top of it and keep all in the fridge. The panir will be ready to cook the next day. You can freeze it as a whole piece or cut into cubes.
The salt may be added right after the panir is poured into the strainer and mixed in slowly with spoon or just hand.

Enjoy

.

Tuesday, May 22, 2012

Hara (green) Masala Chicken

Here is my way of making this delicious chicken recipe.

Ingredients:

For masala:
Use  1 1/2 tsp of this masala
4 green cardamoms
5 cloves
1 black cardamom
1 tsp fennel seeds
1 stick cinnamon
1 anise star

For the meal:
1/2 kg chicken
1 medium onion 
2/3 cup yogurt 
1tbsp ginger-garlic paste
1 teaspoon cumin seeds
6 curry leaves 
3 tbsp coconut
1/2 teaspoon black pepper
2 green chilies
3/4 cup mint leaves 
1/2 cup fresh coriander

Method:


Separately, dry roast each of the whole spices in a pan. Let them cool down and grind to a fine masala. You will need only 1 1/2 to 2 Tablespoons of it. Remaining masala can be stored in an air tide container.


Combine green chilies, mint, coriander and grind to a paste with 1/2 cup water. Keep aside.


Chop onions and cook them in 3 tablespoons oil until just transparent.  If the onions are fried to brown it can effect on the green color of the meal.


Remove onions from the pan and add cumin seeds for a few mins. You will know they are ready once they start popping and releasing their flavor. Add ginger garlic paste and curry leaves. Cook for a 3-4 mins and stir to avoid burning.  Add onions, chicken pieces, black pepper and masala. Mix well and let the chicken get partly coked from all sides. 


Pour in the green paste, yogurt, add coconut and salt mix well again and cover to cook on a low flame until the chicken is done and the sauce is thicken.


In case you don't like hot food,  use only one or none chilies. If you like hot food go ahead and use 2 chilies :). The most chilies I used for this recipe was 3 big ones and it was hot, but yummy !!!!


Enjoy!


Tuesday, May 15, 2012

Flower Bread

Here is one more recipe of a home made round bread:

Flower Bread

Ingredients:
3 eggs
4 cups flour ( I used 2 all purpose, 2 whole wheat)
1 and 1/2 cup yogurt
1/2 cup oil
1 tablespoon yeast
1 teaspoon sugar
2 teaspoons salt
2 tablespoons warm water

Method:

Mix 2 tablespoons warm water with sugar, 1 teaspoon salt, yeast and a teaspoon flour. Let it rest for 10-15 mins in a warm dark place.
Grease and 9 inch round baking pan.

In a bowl mix the flour and rest of the salt. 
Pull the flour to the ends of the bowl and pour in the center the yeast, oil and yogurt.
Start mixing until it forms a dough. Transfer to a floured flat surface and start to knit until the dough is smooth, 10-15 mins. The more you knit the dough, the better and not only for this bread, for most of them unless is stated otherwise!!! 
If you need add more flour to the working area, make sure the dough doesn't stick to the flat surface you are using to knit it! 
Transfer the dough to an oiled bowl and cover with a towel. Keep in a warm and dark place until it doubles it size, around 1 or 1:30 hour. I usually preheat the oven little bit  and let the dough rest there. It works great for me :). Do not open the oven until you are ready to use it again. Start the light to check how it is doing if you need to.
Next, you will take the dough and separate one big piece for the center, 8 small for the flower petal, and 6 smaller for the rest of the flower pieces.
Form a round ball  and place it in the middle of the baking dish. Take each of the bigger 8 pieces and roll them out to a rectangle shape, then just roll them and place around the big circle. Do same with the smaller pieces and place them in between the big 8 petals.
Cover with towel and let it rest for 30 min in a warm dark place again. The dough will rise. Brush oil or egg yoke on top if you wish, you can also spread some sesame seeds, or sea salt. IN case you are brushing the top with an egg, do not use cold egg straight from the fridge. It needs to be room temperature. If the egg is cold it will make the risen bread flatten immediately and the bread wont bake well.

Bake in preheated to 350 oven for about 30-35 mins
Before taking it out check with tooth peek if its ready. Insert the tooth peek in the middle of the bred, if it comes out clean the bread is ready, if it's sticky you need to bake it for some more time. Keep checking every 5 mins.
*********************************************************
TIPS:
Make sure you always have extra flour handy in case you need more to form a soft, non sticky dough.
If the dough seems too dry, oil your hands and knit it until it feels smooth. You may need to add some more oil to it, that is fine, just work with very small amount at a time. Enjoy!


LOKUM - TURKISH DELIGHT

This is a sweet we grow up eating, but never made at home. It was always available in the stores in a rose flavor.
A while ago, I found a recipe somebody gave me more than 10 years now, and here I'm trying it out for second time... The result is quite good and just like the lokum I ate as a kid :). I grow to like nutty or coconut turkish delight, but the rose flavor one will always be the one taking me back to my childhood and my home then ...
Here is the recipe:


LOKUM - TURKISH DELIGHT 


Ingredients:
4 cups sugar
4 1/2 cups water
2 teaspoons lemon juice
1 1/4 cups cornstarch
1 teaspoon cream of tartar
1 1/2 tablespoons rosewater
1 cup confectioners sugar
optional: 
food coloring 
pistachios, almond, hazelnuts or coconut flakes


Method:


Oil a 9-inch pan. If it is best to use a square one, but if not available a round one would do as well.


First, combine all 4 cups sugar, 1 1/2 cups of the water, and the lemon juice. Stir well until the sugar dissolves and the mixture boils on a medium flame. Reduce the heat and simmer gently, without stirring, until the mixture reaches the soft-ball stage. Remove the pan from the heat.
Next, in a second large heavy saucepan over medium heat, stir together 1 cup cornstarch and the cream of tartar. Gradually stir in the remaining 3 cups of water and make sure  no lumps remain. Stir constantly, until the mixture boils and is a thick, gluey paste.
Slowly pour the hot sugar, water, and lemon juice syrup into the cornstarch mixture, stirring constantly. Reduce the heat to low and simmer, stirring often to prevent sticking, for about 1 hour, or until the mixture has become a pale golden color. You need to make sure you have a thick consistency, if it is not, the lokum will be watery once cut and stored (I did have this result the first time I made it )!!!!
After an hour of cooking  add the rosewater and a food color and nuts if using it. Mix well.
Pour the mixture in the greased pan and spread it evenly. Let it cool to a room temperature and let it sand over night to set without covering it. if you cover with foil or plastic wrap, it will create moisture in the pan. We don't want this!!! We need the mixture to settle dry.
Sift the confectioners sugar and the remaining 1/4 cup cornstarch onto a large cutting board. Turn the Turkish delight out of the pan on the board and cut around 1 inch squares. Make sure the knife you are using is clean every time you make a cut. You can spread some oil on it for easier cutting also. 
Roll each piece in the confectioners sugar or coconut mixture to coat well on all sides.
The lokum can be stored in an airtight container. If you layer it, use waxed paper dusted with sugar to prevent sticking under and on top of each layer.


Hope you like it!!!


Tuesday, May 8, 2012

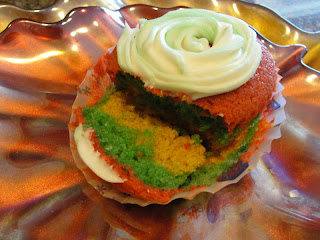
Multicolored cupcakes

Makes 9 cupcakes

Ingredients:
1/2 cup butter
1 cup sugar
1 big egg, or 1 1/2 small
1 cup yogurt
1 teaspoon vanilla extract
1 3/4 cups all purpose flour
1/2 teaspoon baking soda
1/4 teaspoon baking powder
1/4 teaspoon salt

Method:
Preheat oven to 350 F. Prepare paper-lined muffin cups.
Mix flour, salt, baking soda and powder in a bowl and keep aside. (I used 1 cup whole wheat flour and rest all purpose, the flavor didn't change a bit and the moisture was still just right!!)
Cream together softened butter and sugar in a second mixing bowl. Add egg, vanilla and mix well.
Start adding alternatively dry ingredients and yogurt half cup at a time.
The batter will be thick.
Now separate the batter in 4 different bowls and add desired color in each one. Mix well for the color to blend in with the batter.
Now pour little from each color batter in the muffin cups. You can follow same pattern or make different ones.
Bake for 20-25 mins.
Let them cool down completely. Decorate with frosting. You can use store bought frosting or make your own. I find the butter frosting fast and easy to make. You can add some color to it as well, or different  essence.

Butter Frosting:
3 tablespoons butter
2 1/4 cups confectioners sugar
1 table spoon milk
1 teaspoon vanilla extract

Cream sugar and softened butter. Add vanilla and milk. Mix well. Decorate the cupcakes :)
This amount of frosting will be enough to partly cover the cupcakes. If you want you can double all and make more frosting to have a bigger layer on top of the cupcake. If leftover, it can be stored in the fridge for some time.
In case you use too much liquid food coloring to achieve desired color be careful not to make the frosting too watery and omit the milk or add a table spoon or two confectioners sugar. 
*********************************************************************
TIPS:
This is a basic recipe for yellow cupcakes. You can add 1/4 cup cocoa powder and add 2 tablespoons strong coffee to have a chocolate cupcakes. Or have the batter as it is and separate in 2. One half leave white and the other mix with 1 or 2 table spoons cocoa powder to have a brown mix. Pour white and then brown batter in the middle of the cupcake to have marble like cupcakes.
Change the vanilla with rum, almond, coconut extract and top the cupcakes with frosting and chopped nuts, for almond extract, coconut flakes for coconut extract, or a cherry to go with the rum flavor. ...or make your own combination !!!

Enjoy

  • To make the frosting partly colored, I did placed some food coloring on the  inside part of an empty icing bag. Then I carefully placed  some of the frosting and started to press down until the frosting was coming out and I covered only the top part of the cupcake. My kids like it this way :)


Thursday, April 26, 2012

Broccoli-potato soup

Soup, prepared with min effort and great taste.

Ingredients:
1 med potato
1/2 onion
2 cups broccoli
1/2 celery stick
1/2 cube veggie or chicken bullion( this can be skipped)
Salt
nutmeg
3 cups water

Method
Wash and cut all veggies. Cook together with water and  bullion until soft. Cool down and blend to a smooth puree. Add salt and a pinch of nutmeg.

If the soup is too tick, add some milk or plain water as per your taste.
Cream can be used right before serving to add flavor and color.

Black pepper, paprika or cumin powder can be added alone or combined if desires.
Enjoy!

Leftovers

So many times we have leftovers we wonder what to do with..
Here, I will post ideas what we can do with some of them:

Plain Rice
Rice can be frozen in small portions and added to soups, sauces, or cooked with other ingredients to a delicious meal.

If you are making a puree soup, or you want to thicken the consistency of the soup just add the defrosted rice to the blender and here it is!
You can also add the defrosted rice to chicken, meatball, or potato soup at the end.

Bread

Air dry the bread, cut into pieces and blend it to a fine bread crumbs.
Here you can make Italian bread crumbs, by adding Parmesan cheese, dry basil, thyme or oregano.
Another type bread crumbs: mix in dry garlic powder and black paper;
or cumin, coriander, chili powders;
or paprika, dry parsley and black paper;

The bread can be cut into cubes. Mix oil and any of the above mention combination. Mix both and bake to dry on med temperature for 1 or 1.30. Cool down and use in salads and soups.


Bulgarian Banitsa

In general banitsa is a salty snack or breakfast, made from filo sheets and  filling with  eggs and feta cheese. Over the years I've seen and tasted variations with rice and cinnamon, onions, spinach, even with salami and any yellow cheese.. I'm sure people with make even more modifications with this recipe in the future, but I doubt the original one will ever be replaced, it's just so simple to make and yummy for kids and adults!
It is so easy to carry  with you on a car trip, easy to eat at school or work, and its filling :)
Hope you enjoy it!!

Ingredients:

15 -20 filo sheets ( I use Athens brand and for one banitsa I use one of the packages in the box)
4 eggs
1 and 1/2 cup feta (greek) cheese, or you can get bulgarian feta in a russian, east european store
2 table spoons yogurt
1/4 teaspoon baking soda
1 teaspoon salt ( i love extra salt in my food, you can skip this easily, the feta is salty itself)
1/2 cup oil or butter , plus 2 tablespoons at the end
2 table spoon milk
Method:

Grease a baking dish with oil. Preheat oven to 375F.

Filling:
Beat 3 eggs well. Add cheese, yogurt, baking soda and salt if using. Mix well.

Assembling:
Open the package with filo sheets and roll them on a flat surface next to your working place..
We will work on the long side;
Move one sheet in front of you and spread around table spoon over it. No need to be even, we need the oil to make the banitsa softer and to prevent the layers/sheets to blend in.

!!!!!Do not spread the oil and filling on top of the filo sheet stack as it will result in all sheets getting wet, soggy and they may tear easy when you try to move them or roll!!!!
Place the second sheet on top of the first and spread from one end to the other on the long side in a line aprox 2 tablespoons of the filling. Do not place the filling at the end of the sheet, leave around an inch.
                                    
Now, we need to roll up the sheets, as you start from the filling side. We left 1 inch before the egg filling, start from there, cover the filling and just roll the until the end. Make sure you close the ends at the end whit wet finger and then press down firmly , or you can fold the edges of the roll.
                                     
The first long rolled piece will be folded from one side to the other until it forms circle and place it in the middle of the baking pan.

Roll the second piece and place it around the first circle in the baking pan. continue until all filo sheets are finished.

If you have some filling left over, no worries we can use it at the end  to cover the banitsa.
Beat the fourth egg, add the milk and some oil, around 2-3 table spoons in the bowl you made the filling ,  here use any remaining filling, if you have.
Pour slowly all over the baking pan and place it in the preheated oven.
Bake for about 30-35 mins.
The top will appear light brown and sides will be visibly crispy and pulled apart from the baking dish.
Take out of the oven. Cover with a towel to preserve the moisture. Once cooled down it's ready to eat!!
*****************************************************************
TIPS:
If you have leftover sheets, roll them and pack well before frizzing again.
Open the filo sheets right before using them. If they are frozen, you will need to live them for about 2 hours on a room temperature to thaw.
The more oil the oilier and heavy the banitsa will be. I like mine dry, many people like it with more oil.
You can try using 3-4 table spoons at the end and see how you prefer it.
You can use a table spoon or 2 of sugar in the filling. It will make it little sweet.
I know many of our grandmothers used to do this :). I personally don't like this dish sweet, so I never use sugar in it.
Its up to you :)
Enjoy!!


Tuesday, April 17, 2012

Cumin Rice with veggies

This dish is perfect if you have leftover plain rice and need to fix a meal quickly.
I added  peanuts to add more flavor and nutrients to the dish, they can be skipped or replaced with cashew nuts.

3 cups boiled rice ( any type of rice can be used)
1/2 sliced onion
1 table spoon ginger-garlic paste
1/2 table spoon cumin
1/2 cup row peanuts
1 medium red bell pepper( green or yellow will work also)
1/2 cup frozen green peas
3 mushrooms
1 carrot
olive oil
salt
optional : chili powder

Saute onion, bell pepper, carrot and mushroom separately.
Heat 2 table spoons oil  in a pan. Add peanuts and cook for 5 mins on medium flame. Stir few times to avoid the peanuts to burn on one side. Add cumin seeds. They will start to pop once are cooked so be careful not to burn yourself. Reduce to low flame and add the ginger and garlic paste. Cook for 2-3 mins and mix in well the cooked rice and salt. If you are using chili powder add it here. Add all veggies , incl the defrosted green peas. Cook for 5 mins and check salt.


  Serve with chopped cilantro and fresh lemon juice.

Adding shredded coconut to this dish just before serving makes it even better :)
Enjoy! 


Tuesday, April 10, 2012

Sweet bread "Sun"


This is a sweet version of the previous bread I posted.
Its worth trying both of them!!

Ingredients:

3 cups all purpose flour
1/2 cup milk
1/2 cup and 1 table spoon sugar
2 eggs
1 teaspoon vanilla extract
1 table spoon lemon juice
1 tea spoons salt
1 table spoon yeast ( 2 pk)
1 table spoon melted butter


Method:

All ingredients should be at room temperature.
Mix a table spoon of each-salt, sugar, flour. Add the yeast and 2 table spoons of the milk.
Milk can be warm for faster raising of the yeast, but not hot! Keep in a warm and dark place, I use the microwave or oven, for 5-10 mins until you see the mixture forming bubbles on top and its raising.
Beat the eggs, sugar and the milk in separate bowl. Add vanilla and lemon juice.
Combine the eggs, yeast and 2 and 1/2 cup flour and knit until all comes together in a ball.
Transfer the dough to a floured surface and start knitting for 10 mins while using the rest of the flour as needed.
Divide the dough to 3 pieces.
Roll each piece into a circle  and brush 2 of them with butter.
Place each layer on top of the other, the last layer is the one without the butter.
Place a cup in the middle of the top circle and press down. With a knife start making cuts from the cup to the end of the layers. Continue until all of the bred is cut. I made 9 pieces. You can make from 6 big to 12 small. Depends how many you need.

You can also cut 4 pieces,  each one of them to 3 smaller.
Lift each piece with a knife and and twist 1 or 2 times. Press the ends down to the baking dish.


Cover with cloth and let stay in warm and dark place for 1 -2 h. The bread will raise faster if you preheat the oven little bit, for 2 mins on 350. We are not baking the bread at this stage. Just letting it rest and raise.

Next, brush some butter or oil on top of the bread and sugar.
Bake in preheated oven to 350F for 30mins.


Bread ''Sun"

Filled with feta cheese and cut like a sun this bread can be part of any meal for guests and family.

Ingredients:

3 cups all purpose flour
1/2 cup milk
2 eggs
1 table spoon sugar
2 table spoons salt
1 table spoon yeast ( 2 pk)
1 table spoon melted butter
1/2 cup crumbled feta cheese

Method:

All ingredients should be at room temperature.
Mix a table spoon of each-salt, sugar, flour. Add the yeast and 2 table spoons of the milk.
Milk can be warm for faster raising of the yeast, but not hot! Keep in a warm and dark place, I use the microwave or oven, for 5-10 mins until you see the mixture forming bubbles on top and its raising.
Combine the salt and 2 and 2/1 cup  flour.
Beat the eggs and the milk in separate bowl.

Add the eggs and yeast to the flour and knit until all comes together in a ball.
Transfer the dough to a floured surface and start knitting for 10 mins while using rest of the flour as needed..
Divide the dough to 3 pieces.
Roll each piece into a circle  and brush 2 of them with butter.

Here, have the first layer placed in the baking pan and spread half of the cheese on it.
Place the second layer brushed with butter and cover with rest of the cheese. Cover with the third layer.
Place a cup in the middle of the top circle and press down. With a knife start making cuts from the cup to the end of the layers. Continue until all of the bred is cut. I made 9 pieces. You can make from 6 big to 12 small. Depends how many you need.


You can also cut 4 pieces, each one of them to 3 smaller.
Lift each piece with a knife and and twist 1 or 2 times. Press the ends down to the baking dish.

Cover with cloth and let stay in warm and dark place for 1 -2 h. The bread will raise faster if you preheat the oven little bit, for 2 mins on 350. We are not baking the bread at this stage. Just letting it rest and raise.

Next, brush some butter or oil on top of the bread and if you like use sesame seeds and , or sea salt to cover it before baking.  I use both sesame seeds and sea salt .


Bake in preheated oven to 350F for 30mins.


I think I forgot the cheese here:( !!!! 

Saturday, March 31, 2012

Coconut squares

Here is one more recipe for very easy and great tasting sweet desert.

Coconut squares

Cake:
1 stick butter
3/4 cup sugar
1 cup all purpose flour
1 teaspoon baking powder
3 eggs
1 teaspoon vanilla

Sauce:
1 stick butter
3/4 cup water
2 cups sugar
4 table spoons cocoa powder
1 teaspoon rum essence

3/4 cup coconut flakes for dipping the squares in at the end

Method:
Preheat oven to 350F.
Beat the soften butter with the sugar until creamy and light in color. Add the eggs and beat for a few mins.
Mix the flour and the baking powder. Add 1/2 cup at the time to the eggs mixture. At the end add the vanilla and beat for a min or so. Bake in oiled baking dish for about 30 -35 mins.
To make the sauce boil the water with the sugar for 5-6 mins Add the butter and mix well. Cool down for about 30 mins and add the cocoa powder and rum essence.Mix well and use to tip the squares.
Cut the cake into squares when is still hot. Once cooled down deep each piece in the sauce and then in the coconut. Keep aside for the sauce to cool down.
You can also just melt some chocolate and use it to dip the pieces if easier for you.
Enjoy!

Medenki - Honey cookies

Here is a very easy recipe for cookies made with honey. I have it with me from the time I was little kid and I used to make this cookies with my mom. They are very tasty and everybody loves them. I gave the recipe to many people and every time somebody makes them they turn out just great!!!

Honey Cookies

1 cup sugar
2/3 cup oil
2 eggs
1/3 cup honey
2 teaspoons baking soda
1 table spoon cinnamon
4 cups all purpose flour

Method:
Preheat oven to 350F.
Spread some oil on foil or anything you are planning to bake the cookies on.
Beat well oil and sugar. Add one egg at a time and blend with sugar and oil mixture. Pour in the honey, add the cinnamon and beat for a few mins. Mix the flour with the baking soda and start adding it to the egg mixture half cup at a time.  The dough may seem sticky, but with it's ok. You can rub your hands with flour as needed and make balls size of walnut and place them inch apart on foil or baking dish.
Bake for about 12-15 mins. Second batch cookies will be ready in less time, so be careful.
Cool down before storing in air tide container.
**************************************************************
Tips:
You can use 3 cups whole whet flour and 1 all purpose if you want to make them healthier.
You can use brown sugar as well.
Before baking you can place piece of walnut on top of the cookie and just press little down to make sure it doesn't fell off.
Or, you can dip half cookies, after baking and cooling down, in a melted chocolate and then dip same side in crushed nuts your choice.
Enjoy!

Thursday, March 22, 2012

Home made yogurt

Here is how my grandmother thought me to make yogurt :

1/2 gallon whole milk
1/2 cup whole fat plain yogurt room temperature (greek, dannon or any other available in your area)
It is very important to use good yogurt for your first try!!!

Boil the milk on a slow flame and let it cool down to a stage where you slowly dip your small finger into the milk and you can keep it in for a few sec. Now this is old method i learned from my grand mother, I 'm sure now days you can use thermometer, I just never got one of them for cooking and always check the temperature this way. You will need an hour before checking the milk as it takes time for it to cool down. If you live in a very cold area start checking 40 mins after the boil. The more often you make yogurt, the sooner you will learn how long it takes and you will reach to a stage you wont even check the temperature.

If the milk cool down too much worm it on the stove for little bit or in the microwave for 30 sec.
Beat the yogurt with a spoon to make it smooth for easy mixing with the milk.
Once the milk is right temperature move it to a plastic or glass container, add the yogurt, and stir 3-4 times.
Cover the container with its lead or cap and move it to a warm and dark place, where it will stay overnight or approx half day. I usually keep it in the oven.
Do not open the place where the yogurt is until some time have passed, it needs to rest. Do not move the container or shake it.
I live in FL and overnight works great for me. If you live in a cold place you need to wrap the container with towel or something warm before living it to rest. The yogurt needs warm place to get ready.

If you use low fat milk the yogurt will be watery. To avoid that cook the milk on low flame for about an hour and a half or 2 before letting it to cool down. This will help to evaporate the water. The yogurt will be less quantity.

Once the yogurt is ready place it in the fridge to firm. It may be little sour as it stays out in the heat for longer time. Half day should be good for warm clime and 16-18 h for colder.
Enjoy!!

Can we substitute products in cooking and baking?

Absolutely!!
I do it all the time and planing to keep adding to this post as I experiment more things ;)
Have you ever been in a situation where you start cooking or baking and you realized you are out of something the recipe calls for or just want to reduce the butter in it? It happens to me all the times.
I've been cooking and baking over 10 years now and I can say I had my proud moments and my failures. The failures made me try even harder to master a recipe as per my taste and desire. The success gave me the determination to experiment more and more.
I am lucky enough to have a husband who eat everything I cook, even if it's not his favorite, and kids who are asking me all the time to make home made version of things they like. And yes, I make many things at home- yogurt, cheese, jams, ice cream, bread, pretzels, buns and so on...

Now back to the topic of substitution in the kitchen  (that what this post is about, right):


  • Eggs- approx amount of sparkling drink(soda). Now. if the cake is on egg base and requires 5,6 or more eggs, I wont suggest trying this substitution. The result wont be very pleasant. If you need 1 or 2 eggs, go ahead use soda, no problems at all, or you are short on 1 egg and need 5 or 6 altogether, yes you can substitute it. 
  • Butter or oil- same quantity apple sauce (AP) or canned pumpkin (CP). Again, if you are making coffee cake that needs crumbles from the butter, apple sauce wont have same result, but you can use 1/2 butter and 1/2 AS or CP. I assume this will work on shortening also, but I never tried so far.
  • All purpose flour- whole wheat flour 3/4 from the required amount and 1/4 all purpose or wheat germ.
  • Buttermilk-a)1 cup milk and 1 teaspoon white vinegar or lemon juice.mix well and let stand for 5 mins. Now you can use as much as your recipe needs. b) Pour cream in a clean and dry jar. Close the lid tight and start shaking the jar until the cream turn yellowish and a water separate from the cream 10-15 mins. Use the liquid as a buttermilk and rest as a butter. Make sure to knead the butter under cold water to make sure all buttermilk is removed. The butter now can be refrigerated. c) 3/4 cup of yogurt and 1/4 cup milk. Mix both and use as much as you need.
  • Cream for cooking- softened cream cheese. I do this in pasta sauces, soups, or gravies. I use fat free cream cheese instead of the cream just to reduce the calories. Use approx 3/4 of the amount needed mixed with a spoon or 2 of milk (we use 2%) to beat the cheese easier before adding to the cooking meal. Add it at the very end mix well and turn the heat off. The heat from the food in the pan will help the cream cheese melt and spread all over the pan.
  • Sugar in sweets - I use sometime sweetener just to reduce the calories. If you are making cake or something sweet, using sweetener may lead to a different taste and be aware sometimes kind of bitter. I suggest you try before making something for friends and family and see how you like it.
  • Rum or other alcohol in cakes- use essence with same flavor if you want to keep the flavor as per the recipe. I do this as I serve cakes to kids.
  • Coffee in tiramisu for kids- I make small cake for them with cocoa instead coffee and they love it!
  • Baking powder- If you are out of baking powder you can use double the amount baking soda and omit the salt in the recipe. It may have slightly different taste, but nothing too bad. IN case you have cream of tartar and baking soda, you can make your own baking powder: 1 part baking soda, 2 parts cream of tarter and use the quantity needed as per the recipe. Exmpl: mix 1 table spoon soda and 2 table spoons cream of tartar (this will make 3 table spoons baking powder). The recipe needs 1 table spoon baking powder. Take 1 tablespoon from the mixed soda and cream of tartar.
  • Cram of tartar - This needs different ways of substitution in baking and cooking. If you are using in sweets and the recipes needs only cream of tartar ( in comparing with cream of tartar and baking soda in one recipe) you can replace it with lemon juice. The ratio is 3 times lemon juice to 1 cream of tartar. In baking many times it is combined with baking soda, for this I will update later as I haven't tried it yet and wont recommend anything until I try it myself. I made Turkish delight and replaced 1 teaspoon cream of tartar with 3 teaspoons lemon juice. It was great!